Procedure if Separate Access Available for Infusion and Withdrawal
If umbilical access is present for withdrawal (either venous or arterial) use the 4-way stop-cock in the exchange transfusion kit and follow directions below where indicated for preparing the sterile field and 4-way stopcock assembly.
If withdrawal will be through a PIA, use the existing arterial line set-up for lab withdrawal for the blood removal source. The infusion fluid can be set-up as per standard nursing guidelines/procedures.
Step 1:
Pre-procedure |
- Make patient NPO (if not already)
- Order IV fluids to infuse through alternative site if current fluids/medications infusing are incompatible with normal saline (for polycythemia) or if lumen needed for PRBC (for anemia). Note that it is ok to continue TPN if there is appropriate access.
- Order carrier fluids for secondary lumens depending on vascular access
- Order labs so that labels can be printed as needed
- Identify the timer to be used during exchange
|
Step 2:
Preparation of sterile field and 4-way stopcock assembly if using. If not using, go to Step 3
|
- STERILE FIELD PREPARATION (note this is a semi-sterile procedure as existing catheters are not sterile)
- Stop phototherapy if patient receiving
- PPE:
- All staff in room: don hats and masks
- Open exchange transfusion tray
- Provider performing procedure also don sterile gown and gloves
- Ensure UVC and UAC tubing is going to opposite sides of baby
- Establish sterile field on the warmer bed and place sterile drape/towels down
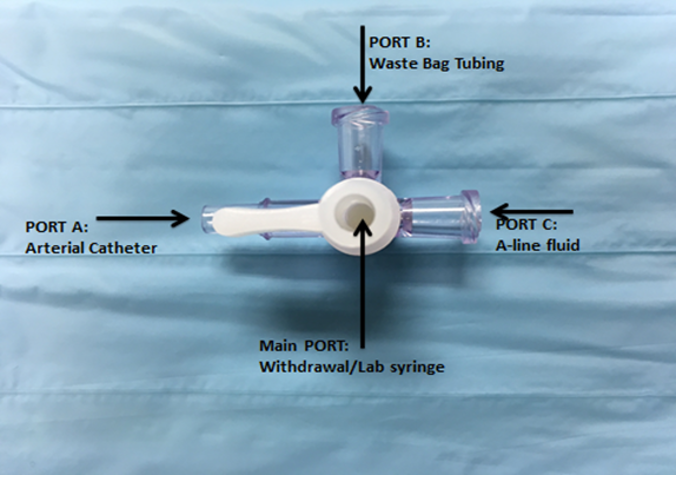
- Assembling the stopcock:
- Place exchange transfusion stopcock and attached waste tubing (pre-attached to port B) on sterile field. Hand the waste bag and the distal end of the waste tubing to a non-sterile helper
- Have a non-sterile helper turn the arterial line stopcock off to the arterial line and then disconnect the arterial line fluid tubing after turning off the pump
- Hold arterial line fluid tubing with a piece of sterile gauze. Clean the distal end of the arterial line fluid tubing with an alcohol wipe and connect to Port C
- Attach a 5 mL syringe to the main port and turn so that it is open to the arterial line fluid and draw up arterial line fluid
- Flush the stopcock and ports with arterial line fluid
- Place this set-up down on your sterile field
- Using a sterile gauze hold the existing arterial catheter and clean the line with an alcohol wipe. Then gently pinch the arterial line to avoid blood leakage and have your helper disconnect the existing stopcock and claves. (if using a peripheral a-line can attach the 4-way stopcock to the t-connector, when disconnecting the existing connections, lock clamp on the t-connector)
- Attach arterial catheter to Port A using arterial line fluid to overfill to avoid air bubbles
- Attach a syringe to the main port and draw off initial labs
- Hand this syringe off and attach the appropriate sized syringe based on the withdrawal pass volume to the main port (it is important whenever disconnecting syringes from the main port to ensure that it is not open to the arterial catheter (i.e. have the main port open to the waste bag or pointed down-ward)
|
Step 3:
Final preparation for the procedure |
|
Step 4:
Performing the procedure |
- Based on start time, determine the times labs should be drawn
- Start exchange transfusion flowsheet in EPIC (recording nurse)
- Start donor blood transfusion per protocol through the venous (infusion) catheter
- Begin withdrawing blood from the arterial catheter UAC or UVC using the 4-way stopcock (4a) or through the port on the PIA (4b)
4a. If using the 4-way stopcock:
The exchange transfusion 4-way stopcock works differently than a standard stopcock
The main port coming from the handle is ALWAYS OPEN and will be open to whichever port the handle is pointed towards. Always rotate the exchange transfusion stopcock CLOCKWISE
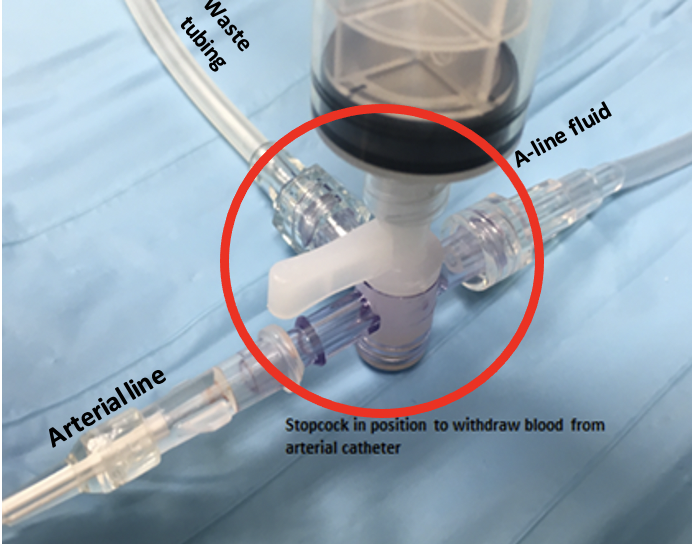 |
i) Using the syringe on the 4-way stopcock, rotate handle clockwise toward arterial (withdrawal) line and withdraw the pre-determined volume over the desired length of each pass. |
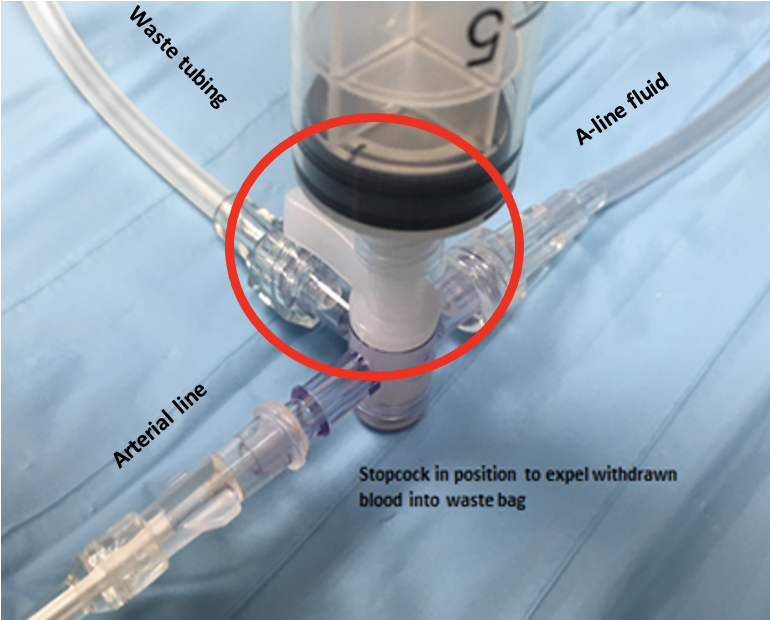 |
ii) Rotate the handle to the waste bag to discard the withdrawn blood |
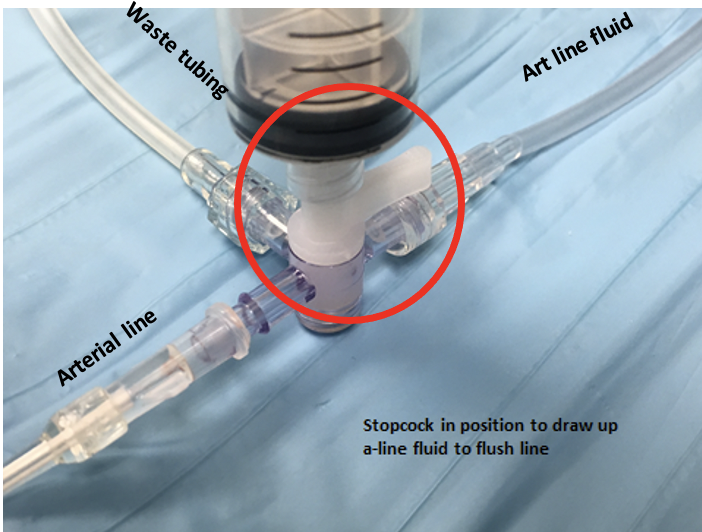 |
iii) At least every 15 minutes, flush arterial catheter with 1-2 mL of heparinized saline drawn from the art line fluid bag attached to the stopcock opposite your arterial line
|
| 4b) If using a PIA for withdrawal without the 4-way exchange stopcock:
- Clean withdrawal hub following hospital guidelines.
- Attach an appropriately sized syringe based on the pre-determined calculation for “pass” volume.
- Slowly withdraw on the syringe coordinating the timing of the withdrawal with the infusion rate.
- Change syringes with each pass.
- Flush arterial line with attached arterial line fluid at least every 15 minutes and more frequently if any concerns for line patency.
|
- Labs should be drawn after the step in the cycle of passes where the patient’s blood is withdrawn so that the UVC is cleared of any blood.
- Detach this syringe and hand off rather than discarding into waste bag. Requires a hub scrub before connecting new syringe. Attach a new sterile syringe to restart your cycle.
|