| Pre-procedure |
- Make patient NPO (if not already)
- Order IV fluids if current fluids are going through the catheter that will be needed for blood withdrawal
- IVF will need to go through a peripheral IV
- Hold TPN during procedure
- Order carrier fluids for secondary lumens depending on vascular access
- Order labs so that labels can be printed as needed
- Identify the timer (apparatus) to be used during exchange
|
| Sterile field preparation and 4-way stopcock assembly |
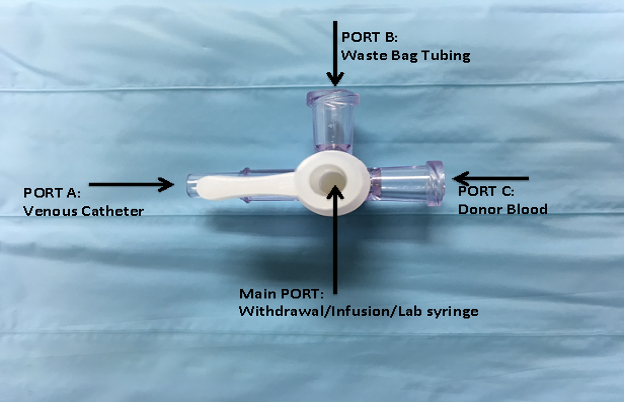
- This assembly is used when a single venous catheter is being used for both withdrawal of blood and infusion of replacement fluid.
- STERILE FIELD PREPARATION (note this is a semi-sterile procedure as existing catheters are not sterile):
- Stop phototherapy if patient receiving
- PPE: All staff in room don hats and masks
- Open exchange transfusion tray
- Provider performing procedure don sterile gown and gloves
- Establish sterile field on the warmer bed:
- Disconnect any fluids running through UVC (stopcock with claves should remain on the UVC)
- Have helper hold UVC up while a sterile drape/towel is placed down and clean UVC tubing with an alcohol wipe
- Place the UVC tubing down on the sterile field
- Assembling the stopcock:
- Place exchange transfusion stopcock and attached waste tubing (pre-attached to port B) on sterile field. Hand the waste bag and the distal end of the waste tubing to a non-sterile helper.
- Flush the stopcock and ports using the sterile saline syringe.
- Attach donor blood tubing from hotline warmer to Port C using a t-connector between hotline warmer blood tubing. (Nurse should tape hot-line warmer tubing to the bed to secure and avoid accidental removal of the line). If for polycythemia, connect normal saline infusion line to Port C.
- Remove stopcock from the venous catheter, gently pinching the UVC to avoid blood leakage.
- Clean UVC hub with alcohol.
- Use the flush and overfill the venous catheter tip and then attach venous catheter to Port A. If you have a double lumen UVC, use larger lumen for exchange.
- Attach a syringe to main port to draw initial labs and hand syringe to nurse sending labs
- Attach an appropriate size syringe (depending on pass volume) to the Main port in preparation to start exchange
|
| Final Prep for Procedure |
|
| Performing the procedure |
- The exchange transfusion 4-way stopcock works differently than a standard stopcock
- The main port coming from the handle is ALWAYS OPEN and will be open to whichever port the handle is pointed towards
- Always rotate the exchange transfusion stopcock CLOCKWISE
- Based on start time, determine the times labs should be drawn
- Start exchange transfusion record in EPIC (recording nurse)
- Based on anticipated length of the procedure, determine the times labs should be drawn
- Begin the exchange cycle
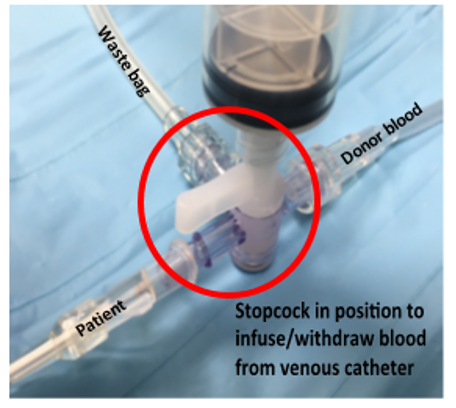 |
5a) Rotate the handle towards the UVC (patient) and withdraw pre-specified volume of blood over pre-specified length of pass. |
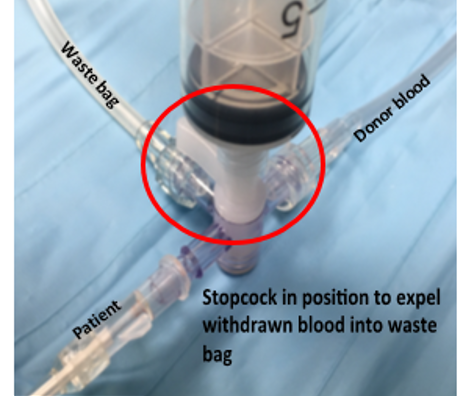 |
5b) Rotate the handle towards waste bag. Discharge patient blood and call out volume withdrawn. |
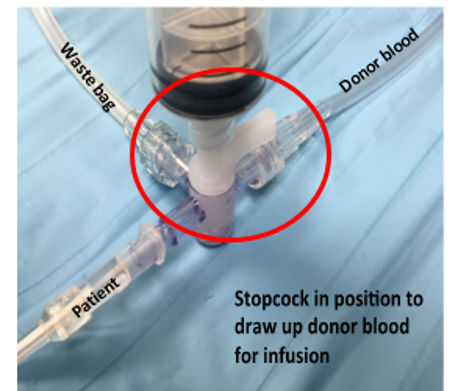 |
5c) Rotate the handle towards donor blood. Draw up volume of donor blood/Normal Saline equivalent to volume of blood withdrawn.
|
| 5d) Rotate the handle toward UVC (patient) and push in donor blood/normal saline over 1 minute and call out volume transfused (Figure 5a)
5e) Repeat steps until the next scheduled lab draw
|
- Labs should be drawn after the step in the cycle of passes where the patient’s blood is withdrawn so that the UVC is cleared of any blood.
- Detach this syringe and hand off rather than discarding into waste bag. Requires a hub scrub before connecting new syringe. Attach a new sterile syringe to restart your cycle.
|